Leverage the MintModal to add minting to your app with ReservoirKit.
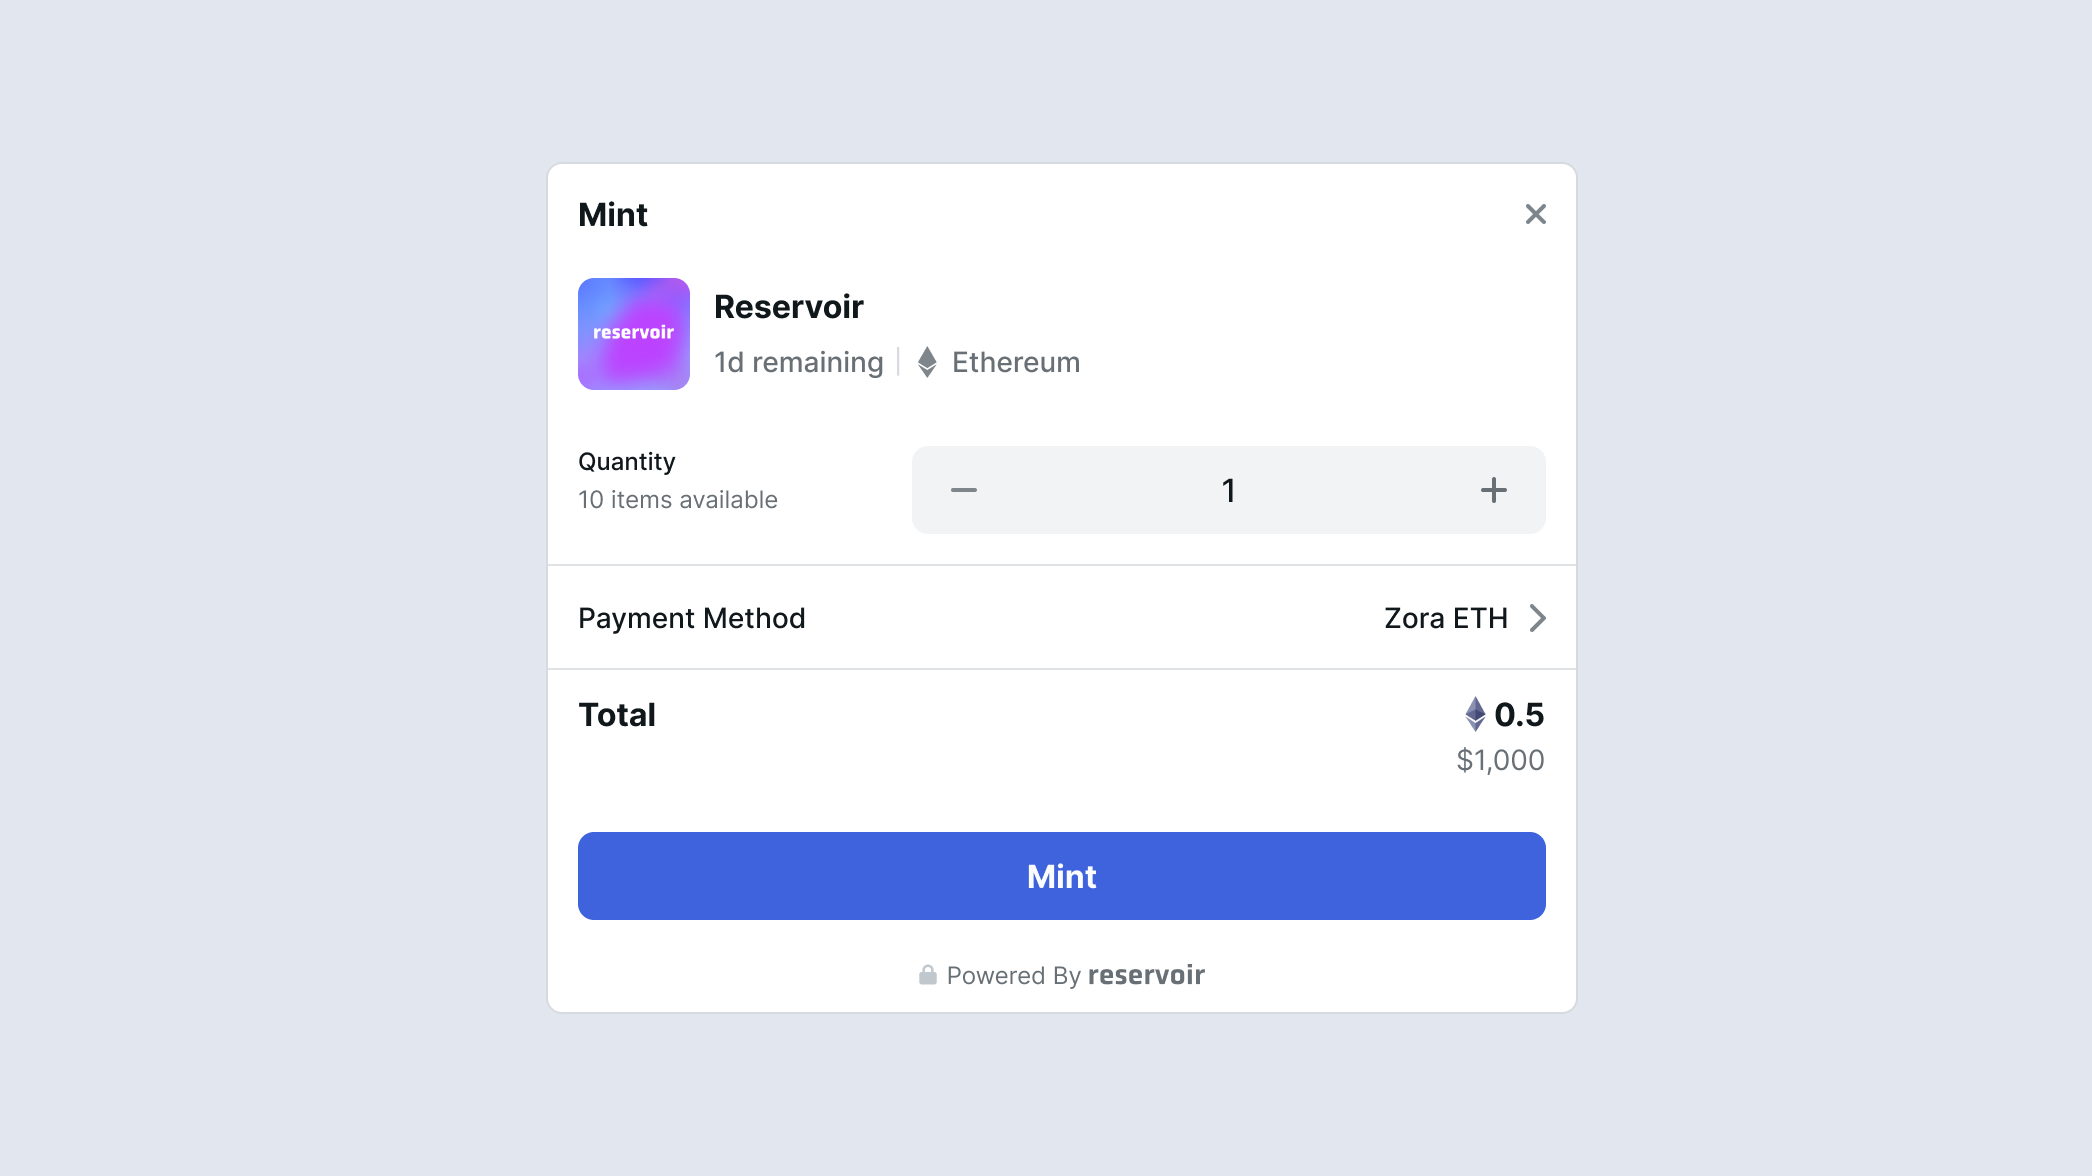
MintModal provides an easy way to mint one or multiple tokens from various contracts.
Prerequisites ⚙️
Install and configure ReservoirKit.
MintModal Setup
ReservoirKit provides a simple to configure modal for adding minting to your react app. Below is an example of a simple MintModal setup.
import { MintModal } from '@reservoir0x/reservoir-kit-ui'

<MintModal
  trigger={
      <button>
      	Mint
      </button>
    }
	onConnectWallet={onConnectWallet}
  contract="0xf5de760f2e916647fd766b4ad9e85ff943ce3a2b"
  onMintComplete={(data) => {
    console.log('Mint Complete', data)
  }}
  onMintError={(error, data) => {
    console.log('Mint Error', error, data)
  }}
  onClose={(data, currentStep) => {
    console.log('MintModal Closed')
  }}
/>
Let's dive into the parameters:
| Prop | Description | Required |
|---|---|---|
| trigger | A react node that will be presented to the user, usually a button or something clickable. | Y |
| contract | The contract address of the collection you wish to mint from. Can be undefined until the data is ready.
| N |
| collectionId | The collection id of the collection you wish to mint from. Can be undefined until the data is ready.
| N |
| onConnectWallet | A function that opens the connect wallet flow. Use this to prompt your connect modal and continue the ux of connecting the user's wallet. | Y |
| token | The token you wish to mint from. Can be undefined until the data is ready.
| N |
| openState | This is a state tuple from react's useState, you can use this to programmatically open or close the modal. The modal will use this state when determining if the modal is open or closed. | N |
| copyOverrides | An object containing copy overrides for titles and ctas contained in the modal. Refer to the ModalCopy type for which tokens map to what copy. | N |
| feesOnTopBps | Used to conditionally apply a referral fee on top of an order when purchasing. The parameter is an array of strings with the referrer and the fee separated by a colon: ['0xabc:250']. The fee is in bps. The fee currency will follow the default rules for the execute buy endpoint feesOnTop parameter. This takes precedence over the feesOnTopFixed. | N |
| feesOnTopUsd | Used to conditionally apply a referral fee on top of an order when purchasing. The parameter is an array of strings with the referrer and the fee separated by a colon: ['0xabc:1000000']. The fee is a flat fee in the atomic unit of usd (6 decimals). It will then be converted to the purchase currency to match the same value in USD. So for example if you have 1000000 configured (1 usd) and the total price is in ETH the fee applied will be ~0.00054 ETH (or whatever is equivalent to 1 usd in realtime). | N |
| chainId | The chain id to force the modal to render, ensure that this is a chain that is configured in the ReservoirKit provider. If not specified then the active chain configured in the ReservoirKitProvider will be used. | N |
| walletClient | A valid WalletClient from viem or a ReservoirWallet generated from an adapter. Learn more about adapters | N |
| defaultQuantity | The default quantity to open the modal with, if the quantity available is higher than the default then the maximum is prefilled | N |
| onMintComplete | Triggered when the mint was completed successfully, returns some useful data about the transaction. | N |
| onMintError | Triggered when the mint resulted in an error, returns the error and the mint data. | N |
| onClose | Triggered when the modal was closed. Returns some useful data about the mint as well as and the current step. | N |
Custom MintModal
The MintModal also comes with a custom renderer which can be used to just get the data layer that the MintModal uses internally to handle the underlying business logic. With the renderer you can rebuild the UI completely to your liking. Below is an example of how it works in practice.
import { MintModal, MintStep } from '@reservoir0x/reservoir-kit-ui'


<MintModal.Custom
  open={open}
  contract={contract}>
  {({
     loading,
     isFetchingPath,
     collection,
     token: tokenData,
     orders,
     totalIncludingFees,
     feeOnTop,
     feeUsd,
     paymentTokens,
     paymentCurrency,
     setPaymentCurrency,
     addFundsLink,
     chainCurrency,
     itemAmount,
     setItemAmount,
     maxItemAmount,
     setMaxItemAmount,
     usdPrice,
     usdPriceRaw,
     currentChain,
     address,
     isConnected,
     disableJumperLink,
     balance,
     hasEnoughCurrency,
     transactionError,
     fetchMintPathError,
     stepData,
     mintStep,
     setStepData,
     setMintStep,
     mintTokens,
  }) => {
    { Your Custom React Elements }
  })}
</MintModal.Custom>
The custom MintModal takes a few parameters like before with one additional one being the open parameter. This is because there is no trigger, you have control over what sort of modal you want this to eventually live in and how to trigger that modal. You'll have the ability to add a custom button with a custom handler, etc. The custom MintModal then passes some key data into the children which we parse above and use in our custom UI. It's also important to note the MintStep here which is used to manage the internal state of the MintModal's logic. You can decide to use all or some of the data passed into your custom implementation.